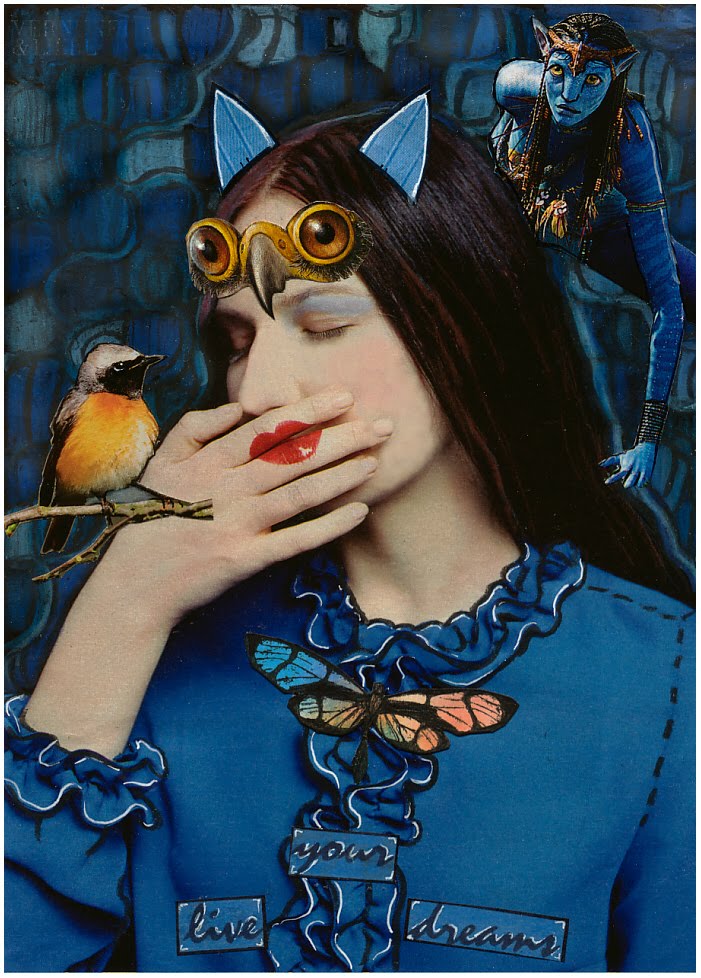
TM challenge : "post a piece of your art on the theme of BLUE!" I´m very late, but I had to do other things. (please click to enlarge)
.....
Dienstag, 31. Mai 2011
Montag, 30. Mai 2011
Crayon Resist or Paper Batik / Wachskreiden Papier Batik
Samstag, 28. Mai 2011
AC Challenge " Paint Chips" become bookmarks / Farbkarten werden zu Lesezeichen
Dienstag, 24. Mai 2011
Once more ACC "Versamark and chalking"
.....
.................................
..............
If you work with chalks and want a colorful picture, use them once and then fix soft with hairspray. Look the 1. photo. Use the chalks once again and fix again, and so on.. till the picture is colorful enough. Background Stamp Judikins.
Wenn man Kreiden kräftig haben möchte, trägt man eine Kolorierung auf und fixiert danach leicht mit Haarspray,
(siehe Foto 1)
erst dann kann man eine weitere Lage Pastellkreide auftragen, das macht man so oft bis die Farben kräftig genug sind. HG Stempel HeinDesign.
Montag, 23. Mai 2011
AC Challenge "Chalking with Versamark" / "Versamark und Kreide"
Donnerstag, 19. Mai 2011
Stamped with versafine, colored only with Pastell crayons.....Gestempelt mit Versafine, nur mit Pastellkreiden koloriert.
Damit die Pastellkreiden farblich kräftig werden, muss man nach dem ersten Kolorieren einen dünnen Hauch Fixativ/Haarspray drübergeben.
Nach dem Trocknen kann man wieder neu Pastellfarbe auftragen/-reiben. Das kann man so oft wiederholen bis es passt.
......
Damit die Pastellkreiden farblich kräftig werden, muss man nach dem ersten Kolorieren einen dünnen Hauch Fixativ/Haarspray drübergeben.
Nach dem Trocknen kann man wieder neu Pastellfarbe auftragen/-reiben. Das kann man so oft wiederholen bis es passt.
......
Dienstag, 17. Mai 2011
WS "Think happy thoughts"
When the flowers begin to grow and blossom again after the long white wintertime, that makes me happy.
............
......
Description:
1. I painted areas with feltpens in yellow turqouoise and magenta on a foil and splashed/spritzed with water.
2. Then I pressed a glossy card on the foil.
3. After that I colored my cheesecloth stamp also only with feltpen stripes in turquoise and magenta, 1. photo and stamped on the background middle
4. and framed with 2 other stamps, look 2. photo
5. I stamped and embossed rose and leaves, spritzed with water and colored with inks.
Mittwoch, 11. Mai 2011
WS "Think happy thoughts"
"This week we want you to think happy thoughts with us. Show us what you’re happy for, what makes you happy"
Art makes me happy, I can't be without creativity. I made my card with this technique
..........
For the background I use as stencil a perforated foil of a vegetable wrap,
here scanned on black paper, cause it is transparent, I hope you can identify it.
I put that perforated foil on white Glossy and wiped with different distress inks:
Ich habe eine perforierte Gemüseverpackungsfolie (siehe Foto drüber) als Schablone genommen, auf eine Glossykarte gelegt und mit verschiedenfarbigen Distress gewischt.
Dann weiter mit der Technik gearbeitet, Ergebnis siehe oben.
Samstag, 7. Mai 2011
Another page with darling "JOY" / Eine neue Seite mit der süßen JOY
I made another page with the cute darling "JOY" from Home Grown, which I recieved as a print gift from Claudia, look also the posting below
Look her face expression. I rather think, that the little Joy don't kow what she present her dear mother at Mother's Day, she has only that paper heart, cause her pocket money is already spent. *g*
(little image for smaller monitor, but it's the same page)
.......
Description:
1.In a magazin I saw that side and took it as base for my page, I found also a body for the darling and the little Degus Rat
2. I stamped the different pattern, 3. glued old paper pieces, edged with distress to cover the image.
4. Colored the stamp face and glued it over the dress and placed it on the page, and the little friend Degus rat below.
..........
Donnerstag, 5. Mai 2011
Art-Card Challenge "Layered stamping background"
The technique is fun, give it a try! I used Distress rusty hinge, vintage photo, Impress Teal and Yellow.
Please join in our AC challenge too.
Die Technik macht Spaß, probiert es selbst. Hab benutzt:Distress rusty hinge, vintage photo, Impress Peal and Yellow. Wir freuen uns, wenn ihr mitmacht bei unserer Wochenchallenge
......
Please join in our AC challenge too.
Die Technik macht Spaß, probiert es selbst. Hab benutzt:Distress rusty hinge, vintage photo, Impress Peal and Yellow. Wir freuen uns, wenn ihr mitmacht bei unserer Wochenchallenge
......
Mittwoch, 4. Mai 2011
WS Challenge: "Hands up" "Hände hoch" "Handen omhoog"
"Hands up … because that’s what we want to see this week! One hand, many hands … Give us a hand at creating something beautiful
using at least one rubberstamp....
Eine Hand, viele Hände … Geh uns zur Hand und kreiere etwas Wunderschönes mit mind. einem Stempelchen."
..................
Description:
1. First I stamped colors on paper for a spotted background (with different inks and water mist from an acrylblock) 2. then I traced alle lines
and areas with marker and Neocolors to create a dark forest for a mystery look.3. After that I added the friends with their raven and the quotation.
......
Abonnieren
Posts (Atom)