skip to main |
skip to sidebar
ich habe einen sehr wild bunten Hintergrund (so kräftig bunt weil Glossy) einfach
in der Mitte halbiert, dadurch wurde er gebändigt und das ist die 1. Karte damit.
............................(Für eine bessere Sicht bitte in neuem Tab öffnen)
.......
The background is made with the blowing ink technique, which Tim Holtz shows in his Video.
Except the word stamps I used Stencils and the blossom and leaves stamps from DesignByRyn.
..... Der Hintergrund ist mit der Pustetechnik entstanden. Hier ein Video von Tim Holtz.
Neben den Wortstempeln hab ich noch Stencils verwendet.
Die Blüten und Blätter sind von DesignByRyn.
Der Hintergrund ist mit der Pustetechnik entstanden. Hier ein Video von Tim Holtz.
Neben den Wortstempeln hab ich noch Stencils verwendet.
Die Blüten und Blätter sind von DesignByRyn.
The background is created with the technique which Tim Holtz shows in his video.
The sentiments and the flowers
are stamped. I strengthened the colorful contours with PanPastells and added black dots with a marker.

 Der Hintergrund ist mit der Pustetechnik entstanden. Hier ein Video von Tim Holtz.Der Spruch und die Blumen
sind gestempelt und zuletzt habe ich noch einge bunte Konturen mit PanPastells verstärkt und schwarze Punkte aufgemarkert.
Der Hintergrund ist mit der Pustetechnik entstanden. Hier ein Video von Tim Holtz.Der Spruch und die Blumen
sind gestempelt und zuletzt habe ich noch einge bunte Konturen mit PanPastells verstärkt und schwarze Punkte aufgemarkert.
Der Hintergrund ist mit der Pustetechik entstanden. Hier ein Video von Tim Holtz.
Neben den Wortstempeln hab ich noch Stencils von Andy Skinner verwendet.
.....
Der Hintergrund ist mit der Pustetechik entstanden. Hier ein Video von Tim Holtz.
Neben Stempeln hab ich noch Stencilpunkte verwendet.


Der Hintergrund ist mit der Pustetechik entstanden. Hier ein Video von Tim Holtz.
Neben Stempeln hab ich noch Stencils verwendet.
....
The background is a glossy card, colored with the amazing blowing ink technique ( I love this)
but I use an Air Duster and the sentiments from Stampendous are stamped with grey Impress.
.... Der HG ist eine Glossy Karte, eingefärbt mit der tollen blowing ink Technik, aber ich benutze
einen Air Duster, und die Worte von Stampendous sind mit grauem Impress gestempelt.
Der HG ist eine Glossy Karte, eingefärbt mit der tollen blowing ink Technik, aber ich benutze
einen Air Duster, und die Worte von Stampendous sind mit grauem Impress gestempelt.
Step 1:The background (click a new tab to enlarge) is made as the video. Step 2: I wiped the non colored areas with different Pan Pastells Step 3: I stamped over leaves and letter with black StazOn. At last I added from Designs By Ryn Candra and Lucine, Raindrops and the little leaves which I had cut out and colored before. I'll link it to TAW.

 Step 1:Der Hintergrund ist wie im video gemacht. Step 2: Ich habe die dabei nicht gefärbten Bereiche mit verschiedenen Pan Pastells gewischt. Step 3: Ich habe Blätter und Brief mit schwarzem StazOn drübergestempelt. Dann habe ich von Designs By Ryn Candra und Lucine, Raindrops und die kleinen leaves aufgeklebt, die ich vorher gefärbt und ausgeschnitten hatte.
My 2. Guest Designer card for Katzelkraft The background is made with blowing colors and the
speckles are splashed with a toothbrush. Then I stamped these amazing new stamp on top (click to enlarge). I hope you like it too and I'm glad you leave a comment. (deutsche Erklärung unten)
..

Meine 2. Gast-Designerkarte für Katzelkraft Der HG ist mit gepusteten Farben gemacht und die
Sprenkel mit einer Zahnbürste.Dann hab ich den neuen Stempel benutzt (so wie er abgebildet ist)
Ich hoffe die Karte gefällt Dir und ich freue mich wenn Du mir einen Kommentar da lässt.
Today I let the background without stamps, cause I want not cover the view on the expressive flow
of colors of the blowing technique. For the technique description please look the post of yesterday.
At last I wiped a bit blue P.Pastell in the sky around the sun which i intensified with yellow gelatos.
....
I want to play again with blowing ink here you can look my older creations. Technique description you can see
here I love the technique with so many possibilities.This time I used Bister colors and water, and not a straw, I
blowed the colors with an air duster, that is much easier. At last I glued the butterflies and the little baby raven.

I used the Scribbly Birds of Dina Wakley on a glossy background with splashed colors,
the branches and flying doves are from RynDesign If you like it, I'm glad you leave a comment
...
The glossy background (2. photo) is made like this video of Tim Holtz using an air duster but I used Copic refiller instead of AAI's. I also used white gelpen, black fineliner for highlights and dots, and Memories inkpad for the Tim Holtz stamps.
Dear visitors, I hope you like my card, and I would appreciate, if you leave a comment, it means a lot to me.
 .....
.....

I've made again a blowing background. (2. Photo) First I dropped an AAI on a Glossy card, then dropped Alcohol over that (so the color gradient will be softer) and immediatly afterwards I blow with the Duster. So I do also with the other colors. Then
I stamped the Circle Cluster Set with black Memories, highlighted the circles a bit with white Gelpen, that was very time- comsuming, and glued the butterflies on. If you like my multicolored creation, I'm glad if you are so kind and leave a comment.
 .....
.....

Background is made with blowing ink technique When I saw T. Holtz using an air duster I do also,
cause it's much easier as a drinking straw! I also used white gelpen, black fineliner and Memories
ink pad. I hope you like my card, and I'm glad, if you leave a comment it means a lot to me.
.......
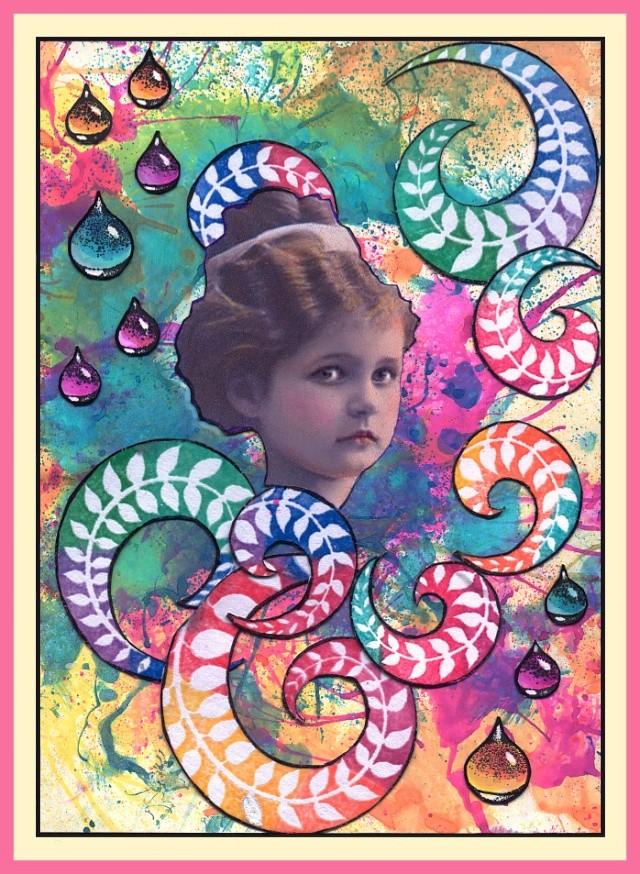
Background technique is blowing with Dylusions. Then I stamped the new Fiddlehead Set from Design By Ryn
with colorful Pigment inkpad and embossed with clear powder. Glued them with the girl and Raindrop Set on top.
Hope you like my card and I'm glad if you leave a comment, it means so much to me, thank you.
.....
For the background I dropped some dylusions colors on cardstock and blow them with an air duster
( is much more easily than with a drinking straw) I stamped the flowers with versamark and embossed with white powder.
After that I stamped again with black Ancient page, glued the butterflies on and added some white dots with Gelpen.
My dear visitors if you like it, I'm glad you leave a comment, it means a lot to me. Please look the other participants of TAW.
......
 ..
..


 .....
.....

 .....
.....


.jpg)


